import pandas as pd
from seeq import spy

# Set the compatibility option so that you maximize the chance that SPy will remain compatible with your notebook/script
spy.options.compatibility = 201
# Log into Seeq Server if you're not using Seeq Data Lab:
spy.login(url='http://localhost:34216', credentials_file='../credentials.key', force=False)
Workbook Templates
A workbook is either a Workbench Analysis or an Organizer Topic. You create workbooks in SPy in a variety of ways:
When you execute spy.push(), a workbook will be created and the signals/conditions pushed will be scoped to that workbook.
You can execute spy.workbooks.push() to push workbooks that have been saved to disk.
You can associate workbooks with asset trees that have been defined using spy.assets.
The easiest way to define the configuration and content of a workbook is by using the Workbench and Organizer user interface to create template workbooks.
Creating a Template
To create an Analysis template, you simply go into Workbench and create a workbook and as many worksheets as you need to define the template. Add “placeholder” items to the worksheet and arrange/configure the worksheet in whatever way makes sense for your use case. You can make entries in the worksheet’s journal as well, including images and workstep links.
The sinusoid() function (using the Formula Tool) is a great way to
create placeholders, because you can easily tailor it to the range and
units you expect to see after you’ve substituted in real data in the
steps that follow.
Once you’re finished configuring the workbooks and worksheets, you will
use SPy to save the workbook to disk so that you can later use it as a
template. Just copy the URL from the browser’s address bar and replace
the value of the url variable in the code below:
url = 'http://localhost:34216/workbook/3EA21D97-782B-472B-B065-2DC76ECC152F/worksheet/4ED5F9B9-D82F-4017-ACEE-0EBBD1CC4E13'

workbooks = spy.workbooks.pull(url)
spy.workbooks.save(workbooks, 'My First Workbook Template')
This will save the workbook files to a folder on disk called
My First Workbook Template and you’ll see how we load it below.
Installing Template Requirements
From SPy 193.0 on, SPy core does not install requirements needed for Templates by default. You may need to execute the install command below to use Templates in your python environment.
# pip install seeq-spy[templates]
Loading a Template
Now let’s say you want to use the template to control the workbook that
is created when you call spy.push().
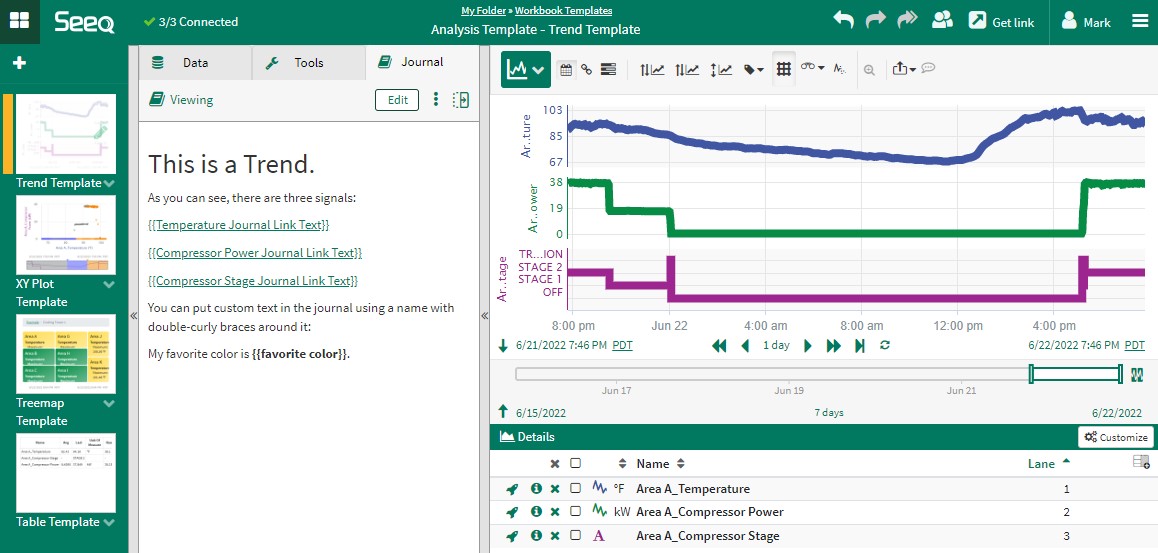
In this example, we’ll use a template that’s built into this SPy documentation notebook. As you can see in the screenshot below, the workbook has been configured with several worksheets. The first is called “Trend Template” and has three items in it.
Notice how the Journal entry has text that is surrounded by
double-curly-braces, like {{favorite color}}. This is referred to as
a mustache variable (named after the popular Mustache templating
system).
These variables can be replaced by values you specify in Python before
you push, as you will see further below.
AnalysisTemplateScreenshot.jpg
# Load the template shown above (included in SPy for the purposes of this example).
# Note how the `as_template_with_label` argument is used here, which is the key to establishing the loaded
# workbooks as templates instead of regular workbook objects. The specified label must be set to something
# unique across the entire Seeq service so that there aren't any identifier conflicts when pushing. If
# you're unsure, just include your name and that will usually be unique. For convenience in this example,
# we will use the logged-in user's name.
workbooks = spy.workbooks.load('./Support Files/Workbook Templates.zip',
                               as_template_with_label=f'{spy.user.username} Workbook Template Example 1')


# Grab the Analysis Workbook from the list
analysis_template = workbooks['Analysis Template']

# Retrieve a specific analysis worksheet from the list of returned workbooks
worksheet = analysis_template.worksheets['Trend Template']

worksheet
workbooks
When you load a workbook as a template, it exposes a code attribute
that tells you how to plug specific items into the template. These are
referred to as the parameters.
print(worksheet.code)
worksheet.parameters = {
    "9564A6B8-8A8F-4F6D-AC63-00EA38962B7A [Signal] Area A_Temperature": None,
    "D2C089B6-CE85-46FC-8392-E11CC0C08336 [Signal] Area A_Compressor Stage": None,
    "DCED9C36-A4BE-4783-9216-DC06B3F57D8C [Signal] Area A_Compressor Power": None,
    "Temperature Journal Link Text": None,
    "Compressor Power Journal Link Text": None,
    "Compressor Stage Journal Link Text": None,
    "favorite color": None
}
This worksheet contains three display items that can be replaced by items of our choosing, as well as several Mustache variables from the Journal.
You will see below how we replace the None values with the items we
want.
Pushing with a Template Worksheet
First let’s create a metadata DataFrame with some sinusoids:
metadata_df = pd.DataFrame([{
    'Name': 'Sinusoid 1',
    'Type': 'Signal',
    'Formula': 'sinusoid(1h)'
}, {
    'Name': 'Sinusoid 2',
    'Type': 'Signal',
    'Formula': 'sinusoid(2h)'
}, {
    'Name': 'Sinusoid 3',
    'Type': 'Signal',
    'Formula': 'sinusoid(3h)'
}])
Next, we will copy and paste the code block that we printed earlier into
a real code cell so that we can set the parameters appropriately. In
this example, we’re just specifying the Name of the signals
(replacing the None placeholders), but we could have supplied
ID, Type, Path and/or Asset values that correspond to
the row being pushed. (It can also be a one-row DataFrame instead of a
dictionary.)
worksheet.parameters = {
    "9564A6B8-8A8F-4F6D-AC63-00EA38962B7A [Signal] Area A_Temperature": {'Name': 'Sinusoid 1'},
    "DCED9C36-A4BE-4783-9216-DC06B3F57D8C [Signal] Area A_Compressor Power": {'Name': 'Sinusoid 2'},
    "D2C089B6-CE85-46FC-8392-E11CC0C08336 [Signal] Area A_Compressor Stage": {'Name': 'Sinusoid 3'},
    "Temperature Journal Link Text": 'SINUSOID 1',
    "Compressor Power Journal Link Text": 'SINUSOID 2',
    "Compressor Stage Journal Link Text": 'SINUSOID 3',
    "favorite color": 'blue'
}

# Give the worksheet a different name than "Trend Template"
worksheet.name = 'My Trend!'
Now we push the metadata DataFrame and pass in the worksheet argument:
spy.push(metadata=metadata_df, workbook='Workbook Template Example 1', worksheet=worksheet)
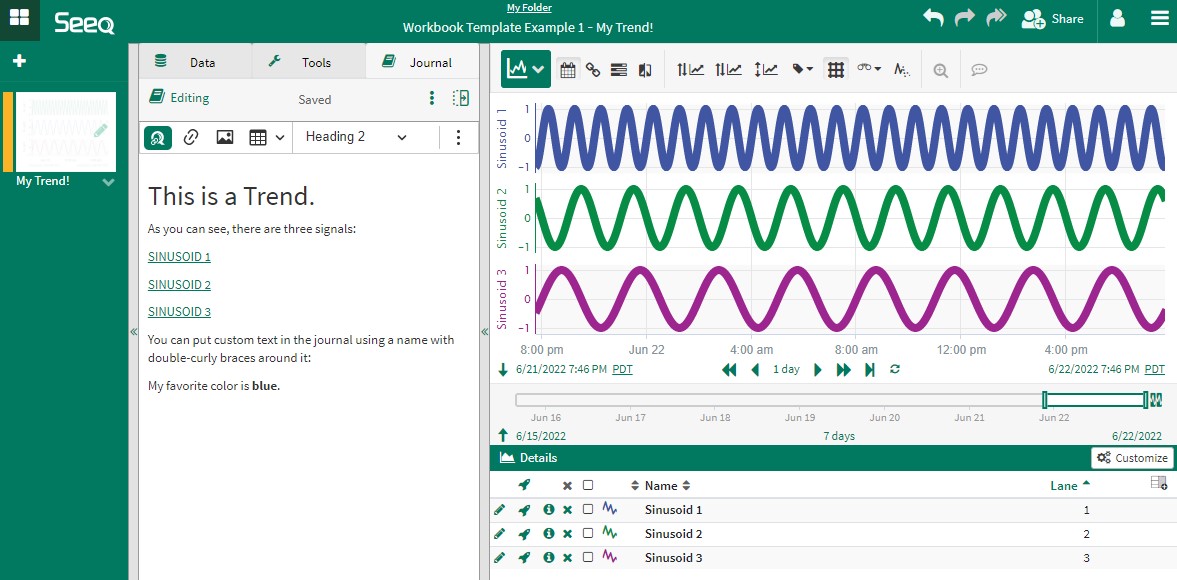
When you click on the link to the workbook/worksheet above, you should see the following:
AnalysisTemplateScreenshot2.jpg
Notice that all of the items have been replaced with the things we
pushed, and the mustache variables in the Journal have been replaced by
the values we specified in the worksheet.parameters above.
Note: Both Journals and Organizer Topics are backed by HTML markup. If
you want to supply HTML as a parameter for one of the mustache
variables, you must declare the variable as {{&Variable Name}}. That
way the HTML will not be “escaped” and be shown to the user literally.
Pushing with a Template Workbook
You can also push an entire workbook instead of just a single worksheet. Following much the same pattern, you will print the parameters code for the workbook like so:
workbooks = spy.workbooks.load('./Support Files/Workbook Templates.zip',
                               as_template_with_label=f'{spy.user.username} Workbook Template Example 2')
# Retrieve a specific workbook from the list of returned workbooks
workbook = workbooks['Analysis Template']

print(workbook.code)
workbook.parameters = {
    "9564A6B8-8A8F-4F6D-AC63-00EA38962B7A [Signal] Area A_Temperature": None,
    "D2C089B6-CE85-46FC-8392-E11CC0C08336 [Signal] Area A_Compressor Stage": None,
    "DCED9C36-A4BE-4783-9216-DC06B3F57D8C [Signal] Area A_Compressor Power": None,
    "Temperature Journal Link Text": None,
    "Compressor Power Journal Link Text": None,
    "Compressor Stage Journal Link Text": None,
    "favorite color": None,
    "07F3161F-6644-4505-BC33-16D6155B004E [Condition] Hot": None,
    "D16FC368-AE8E-47B4-B1A3-9C2A3FBA2BB6 [Asset] Example >> Cooling Tower 1": None,
    "4B40EAFC-91ED-4AB0-8199-F21AF40A8350 [Asset] Example >> Cooling Tower 1 >> Area A": None,
    "8A4F0E26-8A0C-4127-9E11-B67E031C6049 [Signal] Example >> Cooling Tower 1 >> Area A >> Temperature": None
}
Again, we will create a DataFrame full of signals, but this time we’ll put them in an asset tree so we can illustrate how to properly populate a Treemap template.
metadata_df = pd.DataFrame([
    {'Path': 'Waveforms', 'Asset': 'Waveforms 1', 'Name': 'Sinusoid', 'Type': 'Signal', 'Formula': 'sinusoid(1h)'},
    {'Path': 'Waveforms', 'Asset': 'Waveforms 1', 'Name': 'Sawtooth', 'Type': 'Signal', 'Formula': 'sawtooth(1h)'},
    {'Path': 'Waveforms', 'Asset': 'Waveforms 1', 'Name': 'Square', 'Type': 'Signal', 'Formula': 'squareWave(1h)'},
    {'Path': 'Waveforms', 'Asset': 'Waveforms 1', 'Name': 'Hours', 'Type': 'Condition', 'Formula': 'hours()'},
    {'Path': 'Waveforms', 'Asset': 'Waveforms 2', 'Name': 'Sinusoid', 'Type': 'Signal',
     'Formula': 'sinusoid(12h, 15V)'},
    {'Path': 'Waveforms', 'Asset': 'Waveforms 2', 'Name': 'Sawtooth', 'Type': 'Signal',
     'Formula': 'sawtooth(12h, 15V)'},
    {'Path': 'Waveforms', 'Asset': 'Waveforms 2', 'Name': 'Square', 'Type': 'Signal',
     'Formula': 'squareWave(12h, 15V)'},
    {'Path': 'Waveforms', 'Asset': 'Waveforms 2', 'Name': 'Hours', 'Type': 'Condition', 'Formula': 'hours()'},
])
# Provide a name for the pushed workbook. Unlike the previous example where the workbook name was specified
# as part of the push arguments, in this case we override it on the template object. You can override any
# property of a workbook/worksheet prior to pushing.
workbook.name = 'Workbook Template Example 2'

workbook.parameters = {
    "DCED9C36-A4BE-4783-9216-DC06B3F57D8C [Signal] Area A_Compressor Power": {'Asset': 'Waveforms 1',
                                                                              'Name': 'Sinusoid'},
    "9564A6B8-8A8F-4F6D-AC63-00EA38962B7A [Signal] Area A_Temperature": {'Asset': 'Waveforms 1', 'Name': 'Sawtooth'},
    "D2C089B6-CE85-46FC-8392-E11CC0C08336 [Signal] Area A_Compressor Stage": {'Asset': 'Waveforms 1', 'Name': 'Square'},
    "Temperature Journal Link Text": 'Sawtooth',
    "Compressor Power Journal Link Text": 'Sinusoid',
    "Compressor Stage Journal Link Text": 'Square',
    "favorite color": 'beige',

    # This is the condition used to color the treemap
    "07F3161F-6644-4505-BC33-16D6155B004E [Condition] Hot": {'Asset': 'Waveforms 1', 'Name': 'Hours'},

    # This is the signal used for the Maximum statistic in the treemap and its parent assent
    "8A4F0E26-8A0C-4127-9E11-B67E031C6049 [Signal] Example >> Cooling Tower 1 >> Area A >> Temperature":
        {'Asset': 'Waveforms 1', 'Name': 'Sawtooth'},
    "4B40EAFC-91ED-4AB0-8199-F21AF40A8350 [Asset] Example >> Area A": {'Asset': 'Waveforms 1', 'Type': 'Asset'},

    # This is the parent asset that will be used in the Treemap worksheet
    "D16FC368-AE8E-47B4-B1A3-9C2A3FBA2BB6 [Asset] Cooling Tower 1": {'Asset': 'Waveforms', 'Type': 'Asset'}
}
Now when we push, we’ll pass the workbook argument instead of the
worksheet argument.
pushed_df = spy.push(metadata=metadata_df, workbook=workbook)
After pushing, the link will take you to a workbook that has four worksheets whose contents correspond to the template parameters specified above:
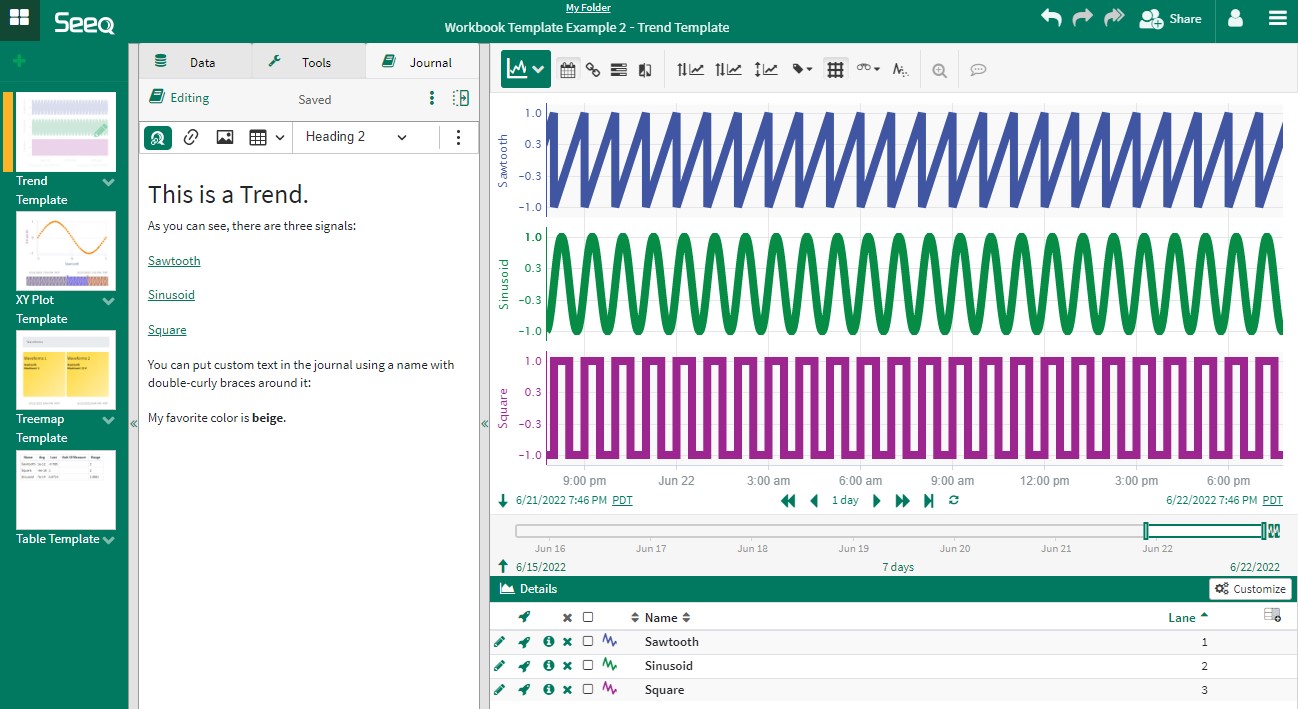
AnalysisTemplateScreenshot3.jpg
Using Pre-existing Signals/Conditions/Scalars etc
In the examples above, we are both creating items
(signals/conditions/scalars/etc) and using them in a template – all in
one call to spy.push().
If the items are already created, then you can use
spy.workbooks.push() instead, like so:
# Retrieve Area B items from the Example Data asset tree
area_b_signals = spy.search({'Path': 'Example >> Cooling Tower 1', 'Asset': 'Area B'})

workbooks = spy.workbooks.load('./Support Files/Workbook Templates.zip',
                               as_template_with_label=f'{spy.user.username} Workbook Template Example 2.1')

workbook = workbooks['Analysis Template']

workbook.name = 'Workbook Template Example 2.1'

workbook.parameters = {
    "DCED9C36-A4BE-4783-9216-DC06B3F57D8C [Signal] Area A_Compressor Power":
        # You can specify a (single) DataFrame row as long as it contains a valid ID column
        area_b_signals[area_b_signals['Name'] == 'Compressor Power'],
    "9564A6B8-8A8F-4F6D-AC63-00EA38962B7A [Signal] Area A_Temperature":
        area_b_signals[area_b_signals['Name'] == 'Temperature'],
    "D2C089B6-CE85-46FC-8392-E11CC0C08336 [Signal] Area A_Compressor Stage":
        # You can specify an ID directly as a string
        area_b_signals[area_b_signals['Name'] == 'Compressor Stage'].iloc[0]['ID']
}

spy.workbooks.push(workbook)
When you click the link to examine the pushed workbook, you’ll see that
the Area A_Xxxxx signals have been replaced with equivalent
Example >> Cooling Tower 1 >> Area B signals.
Modifying the Display Items
In some cases, you need to have more dynamic control over what items are displayed in your worksheet and how. An efficient course of action is to create a worksheet/workbook template that is set up the way you want it with a handful of placeholder items. Then you can completely replace those items with a different set that may be larger or smaller than what’s in the template.
You can change the elements of a worksheet by making function calls and manipulating attributes of the worksheet object. Documentation on the various attributes of a worksheet is available in the spy.workbooks.AnalysisWorksheet online documentation.
Here’s an example:
template_label = 'Workbook Template Example 2.2'
workbooks = spy.workbooks.load('./Support Files/Workbook Templates.zip',
                               as_template_with_label=f'{spy.user.username} {template_label}')

workbook = workbooks['Analysis Template']
workbook.name = template_label

worksheet = workbook.worksheets['Trend Template']
worksheet.name = 'Cooling Tower 1'

# Grab all Temperature signals under Cooling Tower 1
areas_to_add = spy.search({'Path': 'Example >> Cooling Tower 1', 'Name': 'Temperature'})

# Copy this into a variable where each row is indexed by Path/Asset/Name for easy manipulation
display_items = areas_to_add.set_index(['Path', 'Asset', 'Name'])

# See "Manipulating Worksheets" section of spy.workbooks.ipynb for more info on these display item attributes
display_items.at[('Example >> Cooling Tower 1', 'Area A', 'Temperature'), 'Color'] = '#FF0000'
display_items.at[('Example >> Cooling Tower 1', 'Area B', 'Temperature'), 'Lane'] = 2
display_items.at[('Example >> Cooling Tower 1', 'Area B', 'Temperature'), 'Axis Group'] = 'B'
display_items.at[('Example >> Cooling Tower 1', 'Area C', 'Temperature'), 'Lane'] = 2
display_items.at[('Example >> Cooling Tower 1', 'Area C', 'Temperature'), 'Axis Group'] = 'B'
display_items.at[('Example >> Cooling Tower 1', 'Area J', 'Temperature'), 'Line Style'] = 'Short Dash-Dot'
display_items.at[('Example >> Cooling Tower 1', 'Area J', 'Temperature'), 'Line Width'] = 5

# Sort by the index so that they appear in order (Area A, then Area B etc)
display_items.sort_index(inplace=True)

# Reset the index since the worksheet expects a Name column
display_items.reset_index(inplace=True)

# Assign the manipulated DataFrame to the worksheet
worksheet.display_items = display_items

# Create another worksheet with Cooling Tower 2 items. We must supply a unique label to the copy() function for
# bookkeeping purposes.
worksheet2 = worksheet.copy(f'{spy.user.username} {template_label} - Cooling Tower 2')
worksheet2.name = 'Cooling Tower 2'

areas_to_add = spy.search({'Path': 'Example >> Cooling Tower 2', 'Name': 'Temperature'})
worksheet2.display_items = areas_to_add

# Remove other worksheets
workbook.worksheets = [w for w in workbook.worksheets if 'Cooling Tower' in w.name]

spy.workbooks.push(workbook)
The resulting worksheet/workbook should look like this:
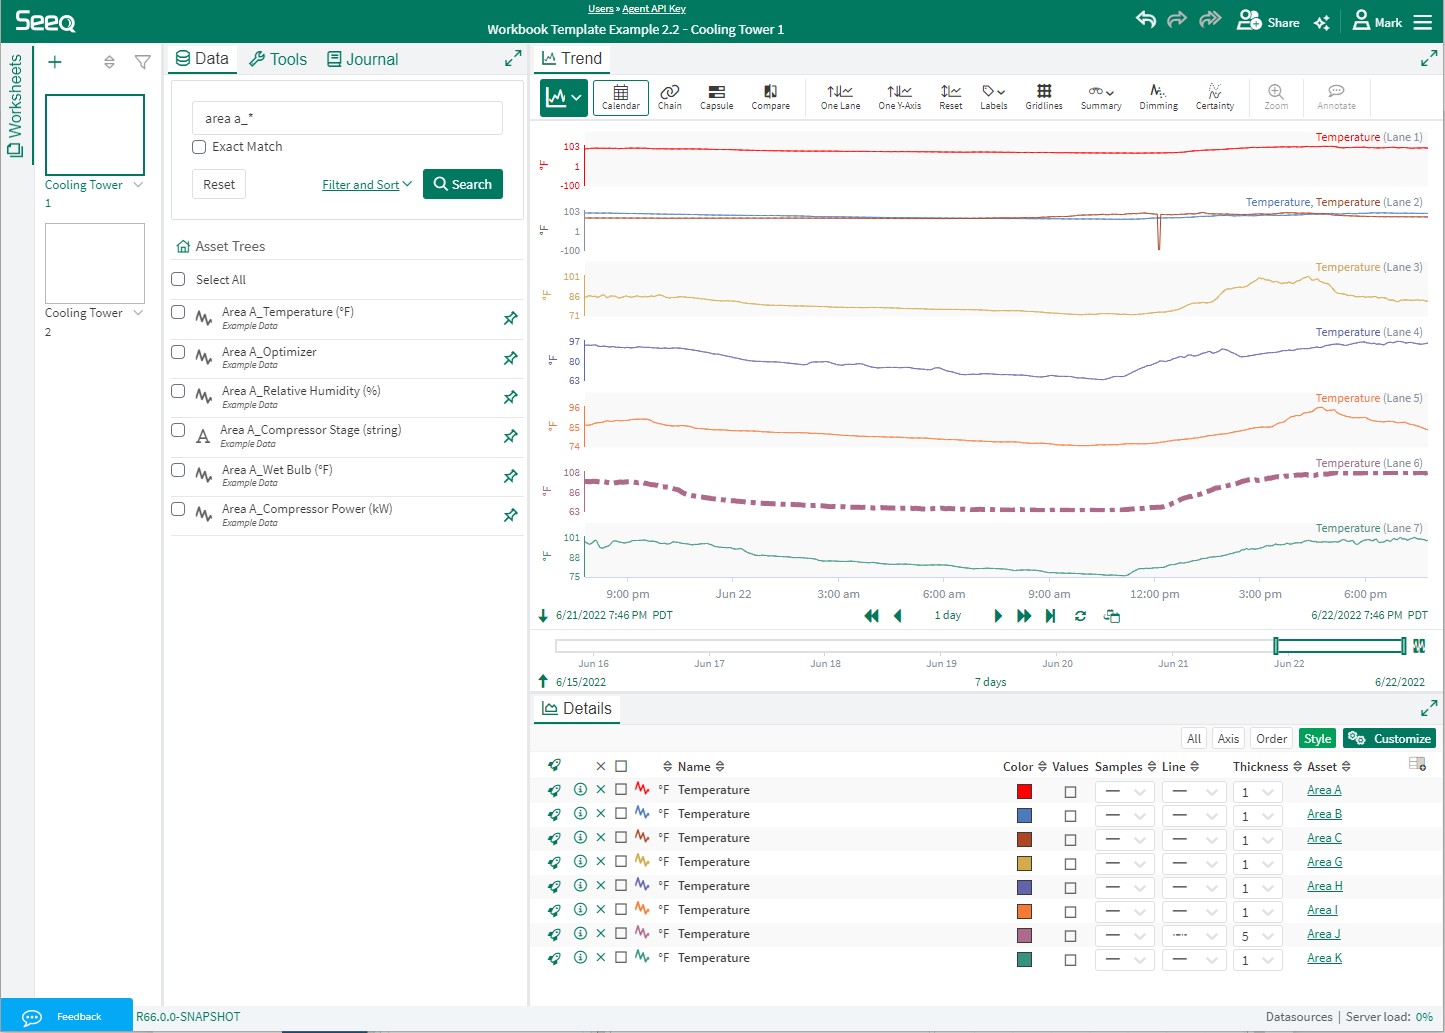
DisplayItemsManipulated2.jpg
You can also combine the use of template parameters with manipulation of
the display items. Specify the template parameters and then
add/remove/modify rows in the Worksheet’s display_items DataFrame.
Added rows will need to have valid ID, Name and Type fields,
which naturally come from spy.search() calls as you see in the
example above.
Pushing a Template Organizer Topic
A template Organizer Topic can also be pushed, with specific content that you specify using a method that builds upon what you learned above.
Since Organizer Topics are nearly always paired with a Workbench Analysis workbook that contains its content, you will be loading and pushing both in this example.
We are going to re-use the template objects from the previous example, but this time we will push all of them instead of just the Workbench Analysis.
A Single Topic Document with Multiple Assets
In this first example, we will create a single Topic Document that has a separate section for each asset.
workbooks = spy.workbooks.load('./Support Files/Workbook Templates.zip',
                               as_template_with_label=f'{spy.user.username} Workbook Template Example 3')

topic = workbooks['Topic Template']
analysis = workbooks['Analysis Template']
This Topic template looks like so in the Organizer user interface:
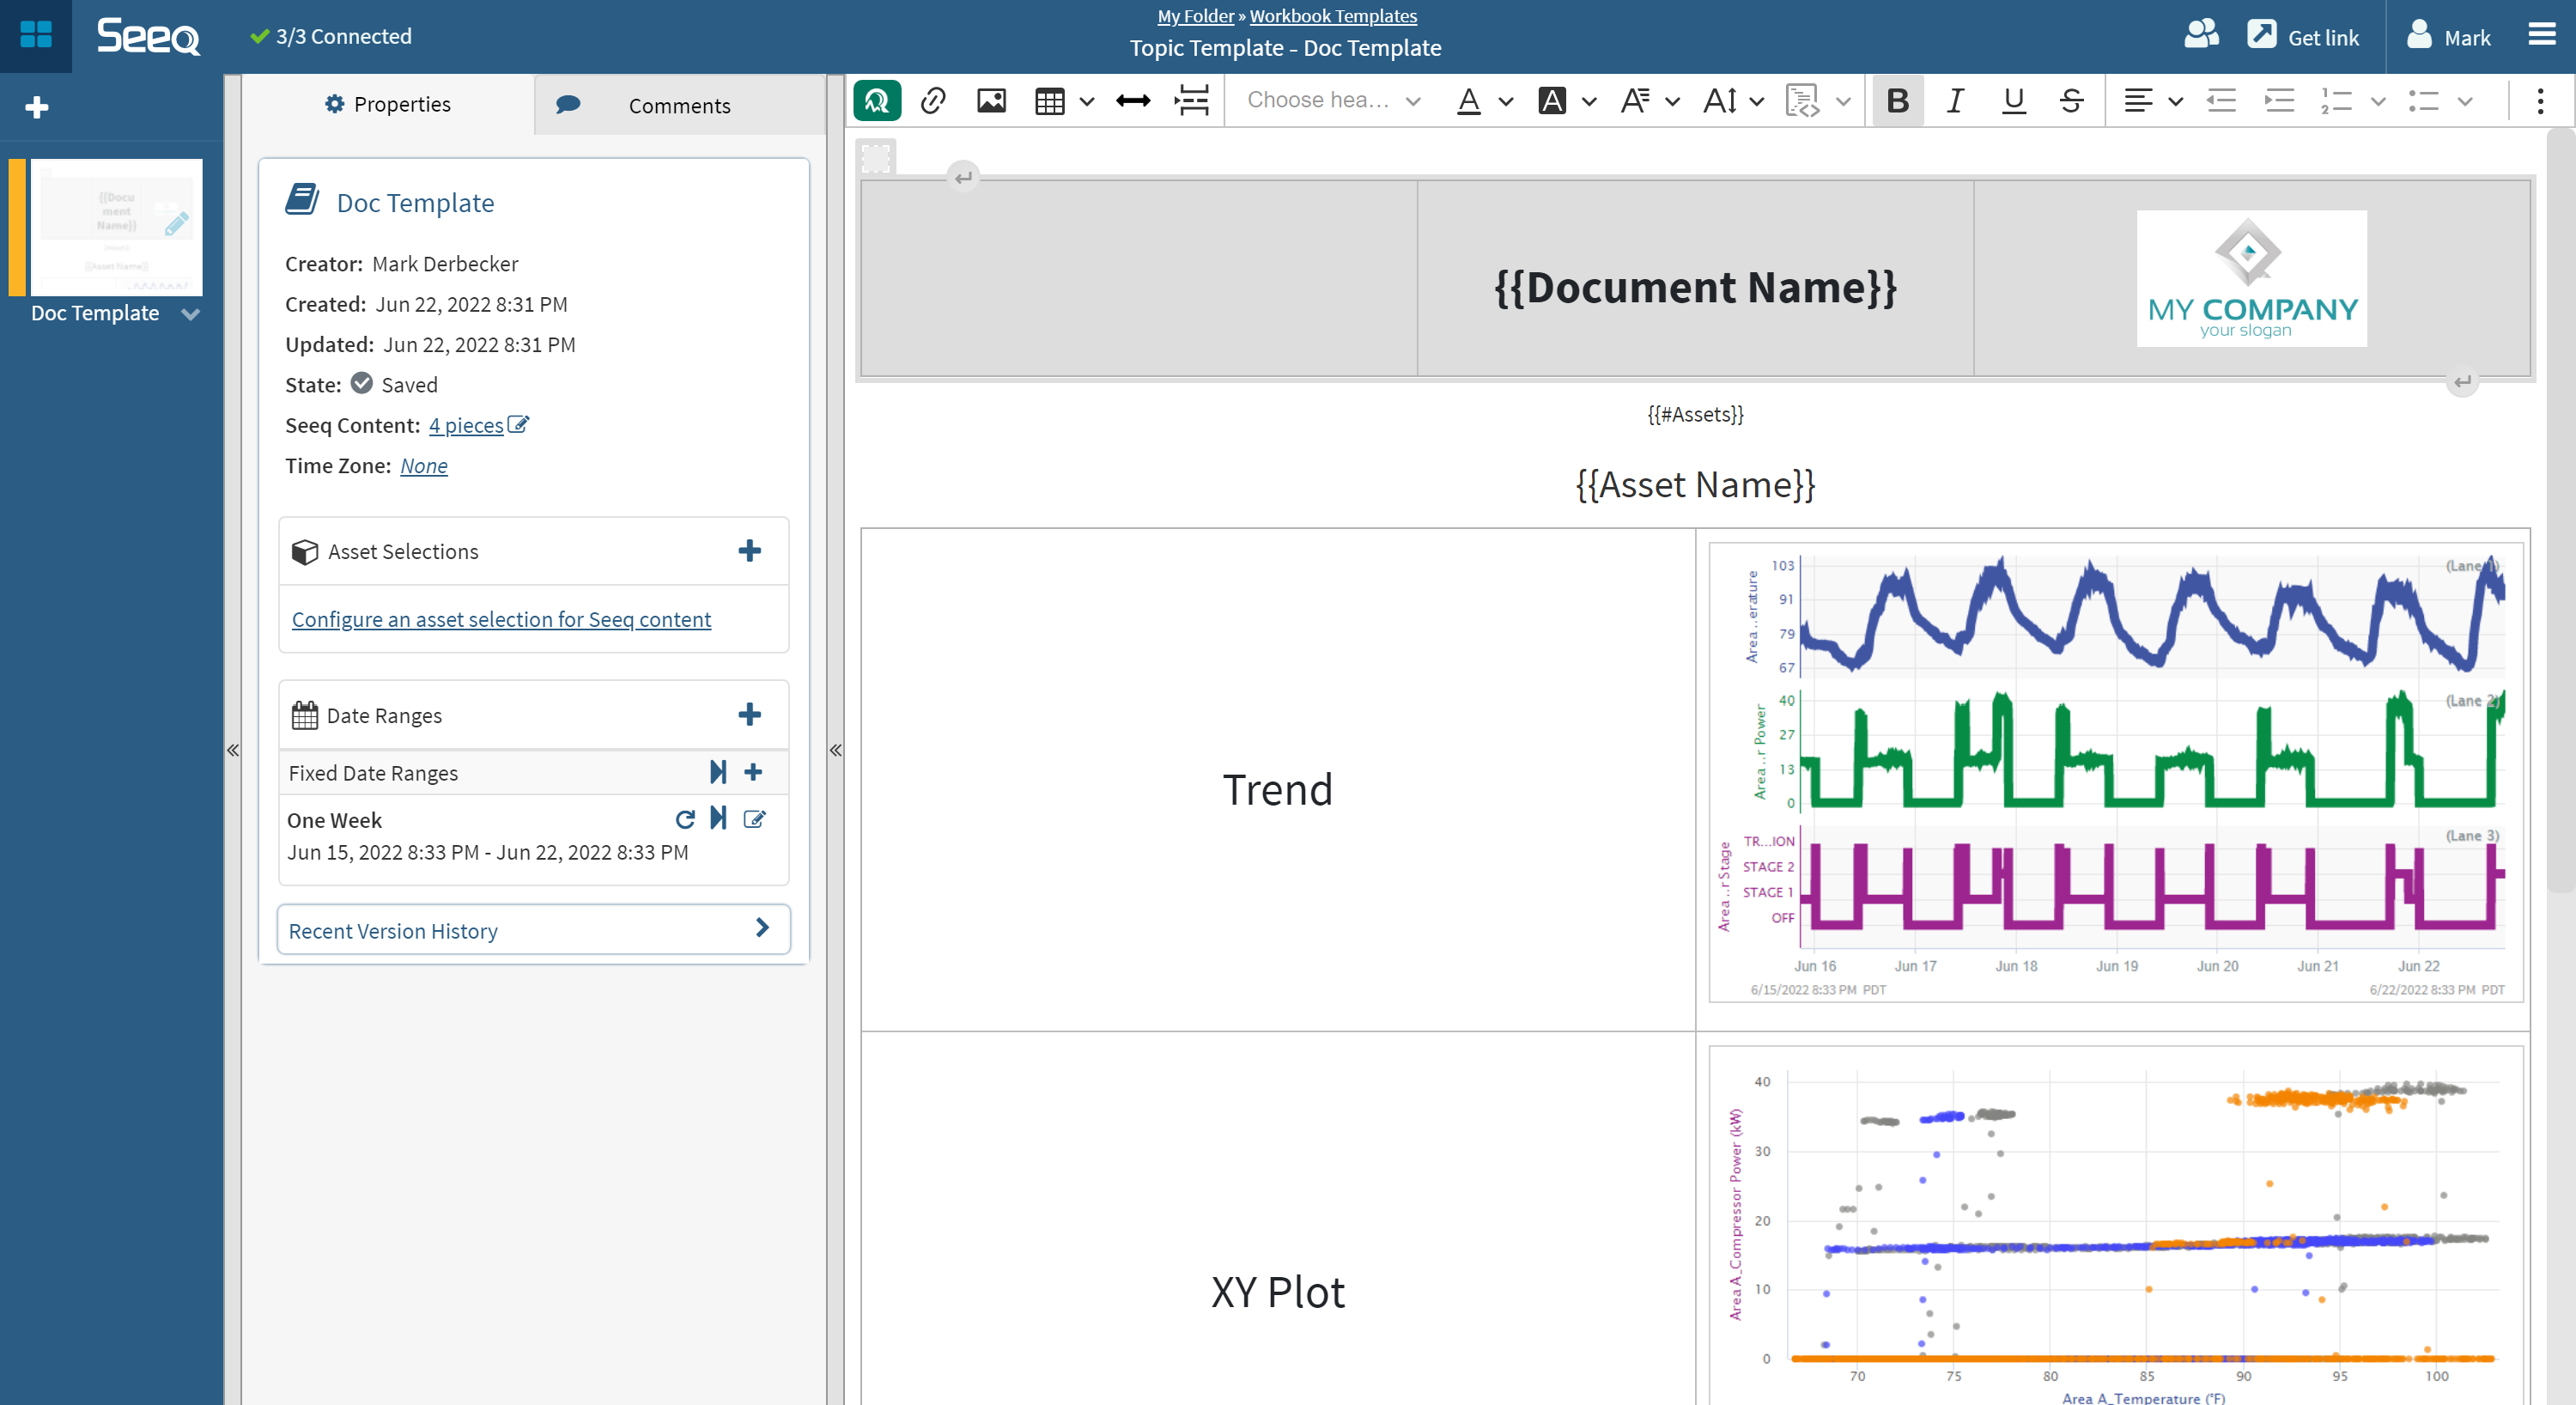
TopicTemplateScreenshot1.png
Notice that there is some embedded content and there are some mustache
variables. In particular, you can see an {{#Assets}} mustache
designation, and if you were to scroll to the bottom, you would also see
an {{/Assets}} entry too. This is a mustache section, which allows
us to repeat a block of the document several times.
(Note that if you want to exert more precise control over how your
section is rendered – for example, if you want each section to be
rendered by a <tr> row in a table instead of as separate tables –
you can use the pretty_print_html=True argument when you save the
workbook templates, and then you can manually go into the saved HTML
files and tweak where the Mustache tokens are placed.)
As you’ll see below, we are going to have a block for each asset.
document = topic.documents['Doc Template']

print(document.code)
document.parameters = {
    "Document Name": None,
    "Assets": [
        {
            "Asset Name": None,
            "25AF462C-602A-4E13-B50D-5DEB92CB37B5 [Embedded Content] Users >> mark-derbecker@seeq-com >> Workbook Templates >> Analysis Template >> Trend Template": None,
            "76B4412D-3B08-48B7-ABF9-ED8432DAA5CE [Embedded Content] Users >> mark-derbecker@seeq-com >> Workbook Templates >> Analysis Template >> XY Plot Template": None,
            "44392AAB-D443-4D2D-ACF0-055869875558 [Embedded Content] Users >> mark-derbecker@seeq-com >> Workbook Templates >> Analysis Template >> Treemap Template": None,
            "D4F167B3-E8BA-4FAA-86B3-05877E2D4250 [Embedded Content] Users >> mark-derbecker@seeq-com >> Workbook Templates >> Analysis Template >> Table Template": None
        }
    ]
}
Notice that the parameters code for the document contains an Assets
entry, and it’s a list that includes entries for each of the pieces of
embedded content (as well as for the mustache variable Asset Name).
We will specify a list of entries that are specific to each asset. First
we need to create a set of content entries in the form of worksheet
templates. Let’s look at the code for each worksheet:
trend_template = analysis.worksheets['Trend Template']
xy_plot_template = analysis.worksheets['XY Plot Template']
treemap_template = analysis.worksheets['Treemap Template']
table_template = analysis.worksheets['Table Template']

print(trend_template.code)
print(xy_plot_template.code)
print(treemap_template.code)
print(table_template.code)
worksheet.parameters = {
    "9564A6B8-8A8F-4F6D-AC63-00EA38962B7A [Signal] Area A_Temperature": None,
    "D2C089B6-CE85-46FC-8392-E11CC0C08336 [Signal] Area A_Compressor Stage": None,
    "DCED9C36-A4BE-4783-9216-DC06B3F57D8C [Signal] Area A_Compressor Power": None,
    "Temperature Journal Link Text": None,
    "Compressor Power Journal Link Text": None,
    "Compressor Stage Journal Link Text": None,
    "favorite color": None
}
worksheet.parameters = {
    "9564A6B8-8A8F-4F6D-AC63-00EA38962B7A [Signal] Area A_Temperature": None,
    "DCED9C36-A4BE-4783-9216-DC06B3F57D8C [Signal] Area A_Compressor Power": None
}
worksheet.parameters = {
    "07F3161F-6644-4505-BC33-16D6155B004E [Condition] Hot": None,
    "D16FC368-AE8E-47B4-B1A3-9C2A3FBA2BB6 [Asset] Example >> Cooling Tower 1": None,
    "4B40EAFC-91ED-4AB0-8199-F21AF40A8350 [Asset] Example >> Cooling Tower 1 >> Area A": None,
    "8A4F0E26-8A0C-4127-9E11-B67E031C6049 [Signal] Example >> Cooling Tower 1 >> Area A >> Temperature": None
}
worksheet.parameters = {
    "9564A6B8-8A8F-4F6D-AC63-00EA38962B7A [Signal] Area A_Temperature": None,
    "D2C089B6-CE85-46FC-8392-E11CC0C08336 [Signal] Area A_Compressor Stage": None,
    "DCED9C36-A4BE-4783-9216-DC06B3F57D8C [Signal] Area A_Compressor Power": None
}
We’re going to create a separate set of worksheets per asset. We’ll do
that by making a copy of each worksheet template in a for loop, and
we’ll store them in a dictionary for later use.
# We're going to reuse this code a couple of times, so we'll put it in a function
def create_worksheets(analysis):
    trend_template = analysis.worksheets['Trend Template']
    xy_plot_template = analysis.worksheets['XY Plot Template']
    treemap_template = analysis.worksheets['Treemap Template']
    table_template = analysis.worksheets['Table Template']

    worksheet_templates = dict()
    for asset in ['Waveforms 1', 'Waveforms 2']:
        # We create a copy of the worksheets for each asset, and it must have a unique label. So we incorporate
        # the asset name into the label.
        unique_label = f'{spy.user.username} Workbook Template Example 3 - {asset}'

        trend_worksheet = trend_template.copy(unique_label)
        trend_worksheet.name = f'{asset} Trend'
        trend_worksheet.parameters = {
            "DCED9C36-A4BE-4783-9216-DC06B3F57D8C [Signal] Area A_Compressor Power": {'Asset': asset, 'Name': 'Sinusoid'},
            "9564A6B8-8A8F-4F6D-AC63-00EA38962B7A [Signal] Area A_Temperature": {'Asset': asset, 'Name': 'Sawtooth'},
            "D2C089B6-CE85-46FC-8392-E11CC0C08336 [Signal] Area A_Compressor Stage": {'Asset': asset, 'Name': 'Square'},
            "Temperature Journal Link Text": 'Sawtooth',
            "Compressor Power Journal Link Text": 'Sinusoid',
            "Compressor Stage Journal Link Text": 'Square',
            "favorite color": 'eggshell' if asset.endswith('1') else 'violet'
        }

        xy_plot_worksheet = xy_plot_template.copy(unique_label)
        xy_plot_worksheet.name = f'{asset} XY Plot'
        xy_plot_worksheet.parameters = {
            "DCED9C36-A4BE-4783-9216-DC06B3F57D8C [Signal] Area A_Compressor Power": {'Asset': asset, 'Name': 'Sinusoid'},
            "9564A6B8-8A8F-4F6D-AC63-00EA38962B7A [Signal] Area A_Temperature": {'Asset': asset, 'Name': 'Sawtooth'}
        }

        treemap_worksheet = treemap_template.copy(unique_label)
        treemap_worksheet.name = f'{asset} Treemap'
        treemap_worksheet.parameters = {
            "8A4F0E26-8A0C-4127-9E11-B67E031C6049 [Signal] Example >> Cooling Tower 1 >> Area A >> Temperature": {
                'Asset': asset, 'Name': 'Sawtooth'},
            "07F3161F-6644-4505-BC33-16D6155B004E [Condition] Hot": {'Asset': asset, 'Name': 'Hours'},
            "D16FC368-AE8E-47B4-B1A3-9C2A3FBA2BB6 [Asset] Cooling Tower 1": {'Asset': 'Waveforms', 'Type': 'Asset'},
            "4B40EAFC-91ED-4AB0-8199-F21AF40A8350 [Asset] Example >> Area A": {'Asset': asset, 'Type': 'Asset'}
        }

        table_worksheet = table_template.copy(unique_label)
        table_worksheet.name = f'{asset} Table'
        table_worksheet.parameters = {
            "DCED9C36-A4BE-4783-9216-DC06B3F57D8C [Signal] Area A_Compressor Power": {'Asset': asset, 'Name': 'Sinusoid'},
            "D2C089B6-CE85-46FC-8392-E11CC0C08336 [Signal] Area A_Compressor Stage": {'Asset': asset, 'Name': 'Square'},
            "9564A6B8-8A8F-4F6D-AC63-00EA38962B7A [Signal] Area A_Temperature": {'Asset': asset, 'Name': 'Sawtooth'}
        }

        worksheet_templates[asset] = {
            'Trend': trend_worksheet,
            'XY Plot': xy_plot_worksheet,
            'Treemap': treemap_worksheet,
            'Table': table_worksheet,
        }

    return worksheet_templates
Now we will fill in the Organizer Topic document’s template parameters
by using the worksheet templates that we assembled above. Note below
that we are using a list
comprehension
to create the Assets list of each Waveform asset.
worksheet_templates = create_worksheets(analysis)

document.name = "Workbook Template Example 3"

document.parameters = {
    "Document Name": "Waveform Monitoring and Diagnostics",
    "Assets": [
        {
            "Asset Name": asset,
            "25AF462C-602A-4E13-B50D-5DEB92CB37B5 [Embedded Content] Users >> mark.derbecker@seeq.com >> Workbook Templates >> Analysis Template >> Trend Template":
                worksheet_templates[asset]['Trend'],
            "76B4412D-3B08-48B7-ABF9-ED8432DAA5CE [Embedded Content] Users >> mark.derbecker@seeq.com >> Workbook Templates >> Analysis Template >> XY Plot Template":
                worksheet_templates[asset]['XY Plot'],
            "44392AAB-D443-4D2D-ACF0-055869875558 [Embedded Content] Users >> mark.derbecker@seeq.com >> Workbook Templates >> Analysis Template >> Treemap Template":
                worksheet_templates[asset]['Treemap'],
            "D4F167B3-E8BA-4FAA-86B3-05877E2D4250 [Embedded Content] Users >> mark.derbecker@seeq.com >> Workbook Templates >> Analysis Template >> Table Template":
                worksheet_templates[asset]['Table']
        }
        for asset in ['Waveforms 1', 'Waveforms 2']
    ]
}
Now we do some final bookkeeping to tidy things up and push. Click on the link that corresponds to the Topic to see it in Organizer.
# Give the topic and analysis a specific name
topic.name = 'Workbook Template Example 3'
analysis.name = 'Workbook Template Example 3'

# Since each of the worksheets we created above is a copy of the template, the template
# worksheets will show separately from the "Waveforms" worksheets. We want to "hide" the
# template worksheets because it's often not interesting and perhaps confusing
# for the user to see the templates. So we set the "Archived" property to True -- they
# will still be pushed, but they'll be in the trash and the user won't see them.
analysis.worksheets['Trend Template']['Archived'] = True
analysis.worksheets['XY Plot Template']['Archived'] = True
analysis.worksheets['Treemap Template']['Archived'] = True
analysis.worksheets['Table Template']['Archived'] = True

# Note that we pass in a list that includes the Analysis and the Topic
pushed_df = spy.push(metadata=metadata_df, workbook=[topic, analysis])

# Show the inner Push Workbooks status object's display instead of the metadata push status,
# since it has links to the Topic.
pushed_df.spy.status.inner['Push Workbooks'].display()
The Organizer Topic should have two sections, one for each Waveform asset, the second of which should look something like this:
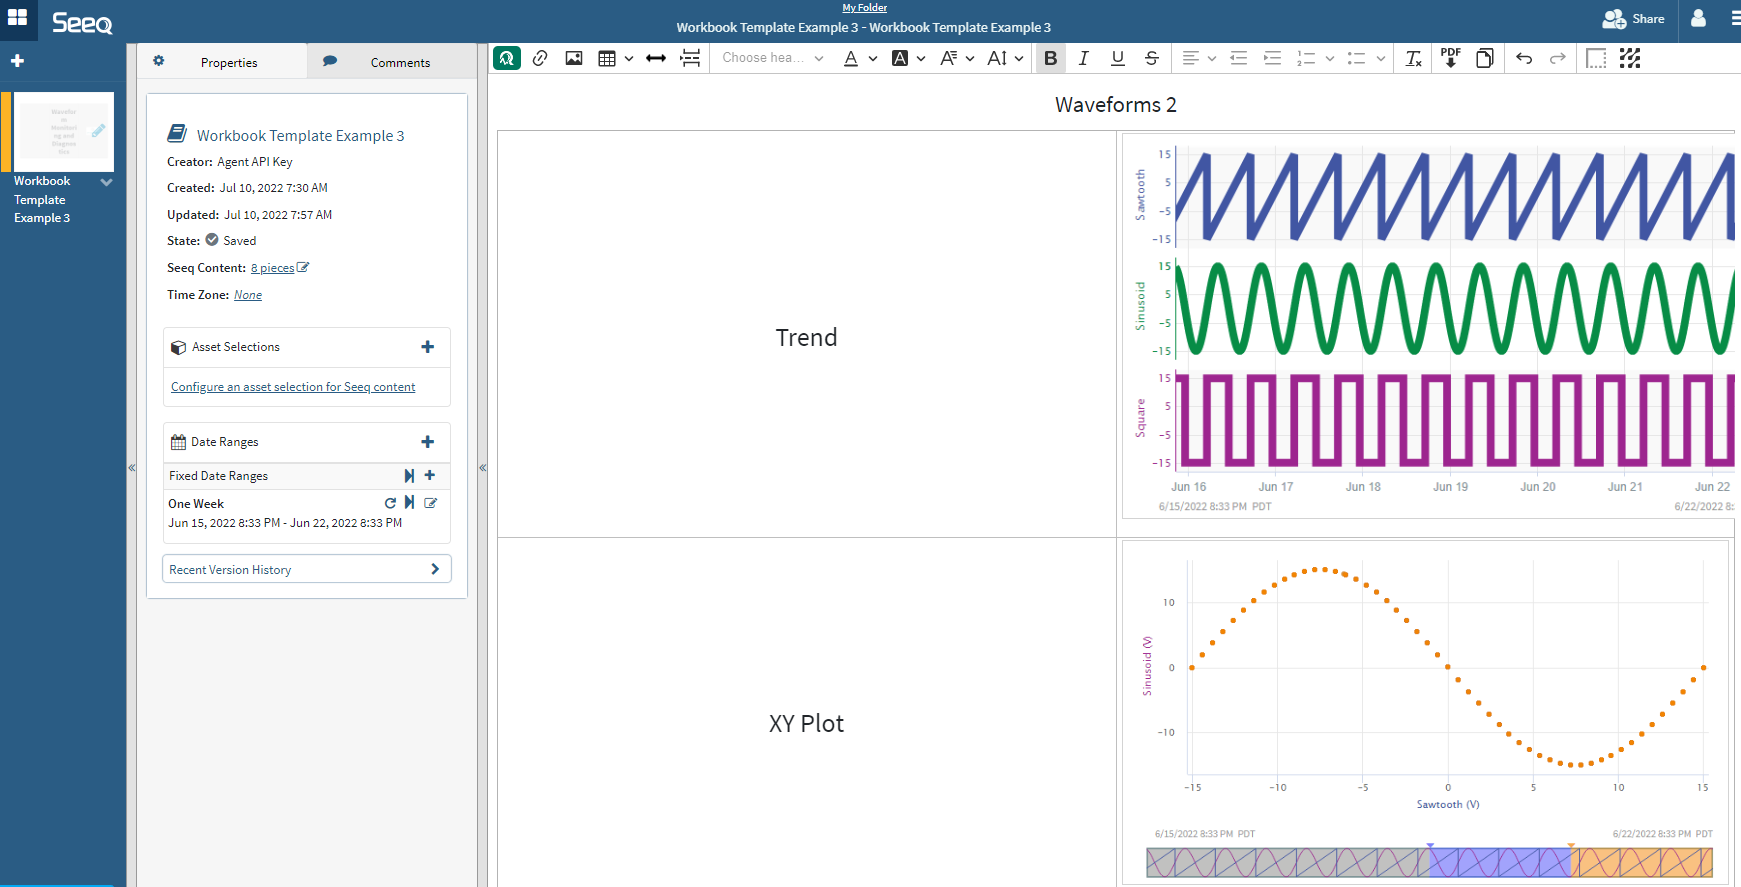
TopicTemplateScreenshot2.png
A Topic with a Document for each Asset
Now let’s see how it would look if you wanted a separate Topic Document for each Asset instead of putting them all in one Document.
It looks very similar, but you’ll see that we use the copy()
function to make separate documents.
workbooks = spy.workbooks.load('./Support Files/Workbook Templates.zip',
                               as_template_with_label=f'{spy.user.username} Workbook Template Example 4')

topic = workbooks['Topic Template']
analysis = workbooks['Analysis Template']

worksheet_templates = create_worksheets(analysis)

topic.name = 'Workbook Template Example 4'
analysis.name = 'Workbook Template Example 4'

# Grab the one and only document as a template. Note that it's name is left over from the previous example.
doc_template = topic.documents['Doc Template']

for asset in ['Waveforms 1', 'Waveforms 2']:
    document = doc_template.copy(label=f'Document for {asset}')
    document.name = asset

    document.parameters = {
        "Document Name": "Waveform Monitoring and Diagnostics - v2",

        # This time, the Assets list is only one item long, since we're putting the Assets in different documents.
        "Assets": [
            {
                "Asset Name": asset,
                "25AF462C-602A-4E13-B50D-5DEB92CB37B5 [Embedded Content] Users >> mark.derbecker@seeq.com >> Workbook Templates >> Analysis Template >> Trend Template":
                    worksheet_templates[asset]['Trend'],
                "76B4412D-3B08-48B7-ABF9-ED8432DAA5CE [Embedded Content] Users >> mark.derbecker@seeq.com >> Workbook Templates >> Analysis Template >> XY Plot Template":
                    worksheet_templates[asset]['XY Plot'],
                "44392AAB-D443-4D2D-ACF0-055869875558 [Embedded Content] Users >> mark.derbecker@seeq.com >> Workbook Templates >> Analysis Template >> Treemap Template":
                    worksheet_templates[asset]['Treemap'],
                "D4F167B3-E8BA-4FAA-86B3-05877E2D4250 [Embedded Content] Users >> mark.derbecker@seeq.com >> Workbook Templates >> Analysis Template >> Table Template":
                    worksheet_templates[asset]['Table']
            }
        ]
    }

# Since we have created a separate document for each asset, we don't want to see the template doc in the Topic
doc_template['Archived'] = True

pushed_df = spy.push(metadata=metadata_df, workbook=[topic, analysis])
pushed_df.spy.status.inner['Push Workbooks'].display()
Alternative Method: Using Asset Selections
You may have a Topic Document that contains an Asset Selection, and you simply want to create separate documents and “pre-select” that asset, and often because you want to have each separate document update on a schedule so that all of the content loads quickly when you try to view it.
You can accomplish this by using the Topic Document’s parameters to set an Asset for the Asset Selection.
To illustrate, first we push some workbooks that would be representative of your starting point: A Workbench Analysis and an Organizer Topic that references it.
# Load and push the basis for this example.
workbooks = spy.workbooks.load('./Support Files/Workbook Templates.zip')

pushed_workbooks_df = spy.workbooks.push([
    workbooks['Asset Selector Analysis Template'],
    workbooks['Asset Selector Topic Template']
], label=f'{spy.user.username} Workbook Template Example 4 - Example Basis')

# Construct a DataFrame of the pushed workbooks for use below
workbooks_to_pull_df = pushed_workbooks_df[pushed_workbooks_df['Workbook Type'] == 'Topic'].copy()
workbooks_to_pull_df.drop(columns=['ID'], inplace=True)
workbooks_to_pull_df.rename(columns={'Pushed Workbook ID': 'ID'}, inplace=True)
Now that we have the basis for our example, we’ll pull these workbooks as a template.
# Pull the workbooks with a template label
templates = spy.workbooks.pull(workbooks_to_pull_df, as_template_with_label=f'{spy.user.username} Workbook Template Example 4')

topic_template = templates['Asset Selector Topic Template']
doc_template = topic_template.documents[0]
The following code finds all the assets under Cooling Tower 1 and then, in a loop, adds separate document for each.
It also takes the opportunity to “spread out” the background schedule by ten minutes so that they aren’t all being done simultaneously.
# Find all the assets we want
areas = spy.search({'Path': 'Example >> Cooling Tower 1', 'Type': 'Asset'}, old_asset_format=False, recursive=False)

hour = 2
minute = 17
for _, area in areas.iterrows():
    area_doc = doc_template.copy(area['ID'])
    area_doc.parameters = {
        "[Asset Selection] Example >> Cooling Tower 1 >> Area A": area,

        # The name of each doc in the template is "Asset: {{Asset Name}}", which causes "Asset Name" to be available
        # for substitution in the template parameters.
        "Asset Name": area['Name']
    }

    # Spread out the background schedule. We use a convenience method that turns an English-language string
    # into a Cron string. If you want more precise control, the format of the Cron string is documented here:
    # http://www.quartz-scheduler.org/documentation/quartz-2.3.0/tutorials/crontrigger.html
    cron_string = spy.utils.parse_schedule_string(f'Every day at {hour}:{minute}')
    area_doc.schedule['Cron Schedule'] = [cron_string]

    minute += 10
    if minute >= 60:
        minute -= 60
        hour += 1

# Remove the template doc so it doesn't get pushed
topic_template.documents.remove(doc_template)

topic_template.name = 'Scale Across Assets with Asset Selections'

# We're only pushing the Topic template (and excluding the Analysis template). We do this because the Analysis
# (that we want to use) already exists on the server, and we have no interest in creating a second (duplicate)
# Analysis. So the assume_dependencies_exist=True argument is important because otherwise you would get errors
# about dependencies not being found, and these errors would prevent the push from completing.
spy.workbooks.push(topic_template, assume_dependencies_exist=True)
Click the “link” in the far right of the green box and take a look at the pushed Topic, you should see a separate document for each asset, and the schedule is slightly different for each.
A Topic Document with an Image
In the examples above, you saw how to use syntax like {{Asset Name}}
as a placeholder in the template that became a parameter you could
specify in your SPy code.
You can do a similar thing with pictures/images in your document. The most common use for this capability is to push a custom visualization (that you created in Python) into your document, and typically you’ll want to do that on a schedule. A separate Data Lab Visualizations notebook walks you through how to accomplish that.